Computer Repair Book
| Site: | Bopea Masomo Mdandaoni Soma Popote |
| Course: | Bopea Masomo Mdandaoni Soma Popote |
| Book: | Computer Repair Book |
| Printed by: | |
| Date: | Sunday, 14 September 2025, 2:57 PM |
Description
-
Identify and understand the basic components of a computer system
-
Perform hardware installation, upgrades, and troubleshooting.
-
Diagnose and resolve common software issues.
-
Implement effective preventive maintenance practices.
-
Understand and apply best practices for data recovery and security.
-
Use diagnostic tools and software to identify and fix problems.
-
Provide customer service and support in a professional manner.
1. Introduction to Computer Systems
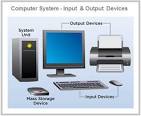
- CPU (Central Processing Unit): The "brain" of the computer, responsible for executing instructions.
- Memory (RAM): Temporary storage for data and instructions the CPU is actively using.
- Storage Devices (Hard Drive, SSD): Permanent storage for data and programs.
- Input Devices (Keyboard, Mouse): Devices used to enter data into the computer.
- Output Devices (Monitor, Printer): Devices used to display or print results.
-
Operating System (OS):Manages the computer's resources and provides a platform for other software.
-
Application Software:Programs designed for specific tasks, like word processors, web browsers, or games.
- Supercomputers: The most powerful computers, used for complex scientific calculations.
- Mainframe Computers: Large, powerful computers used by organizations for processing large amounts of data.
- Minicomputers: Smaller than mainframes, used for various tasks in businesses and organizations.
- Microcomputers (Personal Computers): The most common type, including desktops, laptops, and tablets.
1.1. Understanding Hardware and Software
1 Hardware
· Definition: The physical components of a computer system.
· Examples: CPU, RAM, HDD/SSD, monitor, keyboard, mouse.
· Functions: Performs the actual computing tasks and provides the physical interface for user interaction.
2 Software
· Definition: The programs and instructions that run on the hardware.
· Types:
o System Software:
§ Operating Systems (OS): Manages hardware resources and provides a user interface (e.g., Windows, macOS, Linux).
§ Utilities: Programs that perform specific tasks like disk cleanup, antivirus, etc.
o Application Software:
§ Productivity Software: Word processors, spreadsheets, presentation software.
§ Graphics and Multimedia Software: Photo editors, video editors, music production tools.
§ Internet Software: Web browsers, email clients, social media apps.
§ Gaming Software: Video games and gaming platforms.
· Functions: Provides functionality and services to the user, manages and controls hardware resources.
1.2. Basic Computer Components
1 Central Processing Unit (CPU)
· Definition: The CPU is the brain of the computer, responsible for executing instructions and performing calculations.
· Components:
o Control Unit (CU): Manages and coordinates the activities of the CPU.
o Arithmetic Logic Unit (ALU): Performs arithmetic and logical operations.
o Registers: Small, fast storage areas within the CPU used to hold data and instructions temporarily.
· Types:
o Single-core CPUs: Process one instruction at a time.
o Multi-core CPUs: Contain multiple processing units, allowing for parallel processing.
o Hyper-threading CPUs: Simulate multiple CPUs by allowing each core to handle multiple threads.
· Performance Metrics:
o Clock Speed: Measured in GHz, indicating how many cycles the CPU can perform per second.
o Number of Cores: More cores generally mean better performance for multi-threaded tasks.
o Cache Size: The amount of fast memory available to the CPU for temporary storage.
2 Memory
· Random Access Memory (RAM)
o Definition: Temporary storage used by the CPU to store data and instructions that are currently being processed.
o Types: DDR3, DDR4, etc.
o Characteristics: Volatile (data is lost when power is turned off).
· Read-Only Memory (ROM)
o Definition: Non-volatile memory used to store firmware and BIOS.
o Characteristics: Data is not lost when power is turned off.
3 Storage Devices
· Hard Disk Drives (HDD)
o Definition: Mechanical storage devices that use spinning disks and read/write heads to store data.
o Characteristics: High capacity, slower access times compared to SSDs.
· Solid State Drives (SSD)
o Definition: Non-mechanical storage devices that use flash memory to store data.
o Characteristics: Faster access times, no moving parts, more durable.
· External Storage
o USB Drives: Portable storage devices that connect via USB.
o External HDDs/SSDs: Larger capacity storage devices that connect via USB or other interfaces.
4 Input Devices
· Keyboard
o Types: Mechanical, membrane, wireless.
o Functions: Allows users to input text and commands.
· Mouse
o Types: Optical, laser, wireless.
o Functions: Allows users to navigate and interact with the graphical user interface.
· Other Input Devices: Microphones, webcams, scanners, joysticks.
5 Output Devices
· Monitor
o Types: LCD, LED, OLED.
o Functions: Displays visual output.
· Printer
o Types: Inkjet, laser, 3D.
o Functions: Produces hard copies of documents and images.
· Speakers
o Functions: Produces audio output.
6 Motherboard
· Definition: The main circuit board of a computer that connects all the components.
· Components:
o CPU Socket: Where the CPU is installed.
o Memory Slots: Slots for RAM modules.
o Expansion Slots: Slots for additional cards (e.g., graphics card, sound card).
o Ports: USB, HDMI, Ethernet, etc.
2. Hardware Installation and Upgrades
-
1. Preparation:
- Power down: Completely shut down the computer and unplug all cables.
- Ground yourself: Use an anti-static wrist strap to prevent static discharge.
- Gather tools: Have screwdrivers, anti-static wrist strap, and any other necessary tools.
- Clear workspace: Ensure a clean and safe area for working on the computer.
- Power down: Completely shut down the computer and unplug all cables.
-
2. Accessing the Components:
- Open the case: Remove the side panel of the computer case, usually by unscrewing it.
- Locate the component: Identify the specific slot or area where the new hardware will be installed (e.g., RAM slots, expansion slots for graphics card, etc.).
- Clear obstructions: Remove any existing components or cables that may be in the way.
- Open the case: Remove the side panel of the computer case, usually by unscrewing it.
-
3. Installation:
- Align the new component: Carefully align the new hardware with the designated slot, making sure it's properly oriented.
- Secure the component: Press down firmly on the new component until it clicks into place or is secured by screws.
- Connect cables: Attach the necessary power cables and data cables (SATA, etc.) to the new hardware.
- Align the new component: Carefully align the new hardware with the designated slot, making sure it's properly oriented.
-
4. Reassembly and Testing:
- Close the case: Replace the side panel of the computer case.
- Reconnect cables: Plug in all the necessary power and peripherals.
- Power on and test: Turn on the computer and verify that the new hardware is recognized and functioning correctly.
- Install drivers: If required, install the necessary drivers for the new hardware.
- Benchmark: Use benchmarking software to test the performance of the upgraded hardware.
- Close the case: Replace the side panel of the computer case.
- RAM (Random Access Memory): Increase multitasking speed and responsiveness.
- SSD (Solid State Drive): Improve boot times and overall system speed.
- Graphics Card: Enhance gaming or graphic design performance.
- CPU (Central Processing Unit): Increase processing power.
- Storage: Increase storage capacity with a larger hard drive or SSD.
-
Compatibility:Ensure that the new hardware is compatible with your existing system (motherboard, power supply, etc.).
-
Power supply:Make sure your power supply has enough wattage to support the new hardware.
-
Cooling:Ensure adequate cooling for the upgraded components, especially the CPU and GPU.
-
Operating system:Verify that the new hardware is supported by your operating system.
2.1. Upgrading Peripherals
1 Keyboard
· Types: Mechanical, membrane, wireless.
· Upgrade Steps:
1. Disconnect the Current Keyboard: Unplug the existing keyboard from the computer.
2. Install the New Keyboard: Plug the new keyboard into the appropriate USB or PS/2 port.
3. Test the Keyboard: Open a text editor and test all keys to ensure they are functioning correctly.
2 Mouse
· Types: Optical, laser, wireless.
· Upgrade Steps:
1. Disconnect the Current Mouse: Unplug the existing mouse from the computer.
2. Install the New Mouse: Plug the new mouse into the appropriate USB or PS/2 port.
3. Test the Mouse: Move the mouse and click the buttons to ensure they are functioning correctly.
3 Monitor
· Types: LCD, LED, OLED.
· Upgrade Steps:
1. Disconnect the Current Monitor: Unplug the existing monitor from the computer.
2. Install the New Monitor: Connect the new monitor to the appropriate video port (HDMI, DisplayPort, VGA, etc.).
3. Power On the Monitor: Plug the monitor into a power outlet and turn it on.
4. Adjust Settings: Adjust the resolution and other settings in the operating system to optimize the display.
2.2. Installing and Configuring Internal Components
- Central Processing Unit (CPU)
· Definition: The CPU is the brain of the computer, responsible for executing instructions and performing calculations.
· Installation Steps:
1. Preparation: Ensure the computer is powered off and unplugged. Ground yourself to avoid static electricity.
2. Open the Case: Remove the side panel of the computer case.
3. Locate the CPU Socket: Identify the CPU socket on the motherboard.
4. Remove the Protective Cover: Carefully remove the protective cover from the CPU socket.
5. Align the CPU: Ensure the CPU is properly aligned with the socket (look for notches or triangles).
6. Place the CPU: Gently place the CPU into the socket without applying any force.
7. Secure the CPU: Close the retention mechanism to secure the CPU in place.
8. Apply Thermal Paste: Apply a small amount of thermal paste to the center of the CPU.
9. 2, Install the Heatsink: Place the heatsink over the CPU and secure it according to the manufacturer’s instructions.
10. Connect the Fan: Connect the heatsink fan to the appropriate header on the motherboard.
2.1.2 Random Access Memory (RAM)
· Definition: RAM is temporary storage used by the CPU to store data and instructions that are currently being processed.
· Installation Steps:
1. Preparation: Ensure the computer is powered off and unplugged. Ground yourself to avoid static electricity.
2. Open the Case: Remove the side panel of the computer case.
3. Locate the Memory Slots: Identify the RAM slots on the motherboard.
4. Release the Clips: Press down on the clips at both ends of the RAM slot to release them.
5. Align the RAM Module: Ensure the notches on the RAM module align with the keys in the slot.
6. Insert the RAM Module: Gently push the RAM module into the slot until the clips snap into place.
7. Secure the RAM Module: Ensure the RAM module is firmly seated and the clips are fully engaged.
3 Graphics Processing Unit (GPU)
· Definition: The GPU is responsible for rendering images, video, and animations for display on a monitor.
· Installation Steps:
1. Preparation: Ensure the computer is powered off and unplugged. Ground yourself to avoid static electricity.
2. Open the Case: Remove the side panel of the computer case.
3. Locate the PCIe Slot: Identify the PCIe slot on the motherboard.
4. Remove the Backplate: Remove the backplate from the computer case where the GPU will be installed.
5. Align the GPU: Ensure the GPU is properly aligned with the PCIe slot.
6. Insert the GPU: Gently push the GPU into the PCIe slot until it is fully seated.
7. Secure the GPU: Use screws to secure the GPU to the backplate of the computer case.
8. Connect Power: Connect the necessary power cables from the power supply to the GPU.
3. Software Installation and Manageme
-
Installation:The process of adding software to a computer, which may involve downloading installation files, running an installer, and configuring settings.
-
Management:This includes tasks like updating software to the latest versions, managing licenses, and troubleshooting any problems that arise after installation.
-
Deployment:The process of distributing software to multiple users or devices, often involving automation tools and careful planning.
-
Uninstallation:The process of removing software from a computer, which can be done through the operating system's built-in tools or through dedicated uninstallers.
-
Configuration:Customizing the software's settings to suit specific user needs and system requirements.
-
Maintenance:Regularly checking for updates, applying patches, and ensuring the software continues to function correctly over time.
-
Troubleshooting:Diagnosing and resolving issues that may arise during or after installation, such as errors, crashes, or performance problems.
-
Manual Installation:Following step-by-step instructions provided by the software vendor.
-
Automated Installation:Using tools to automate the installation process, especially for large deployments.
-
Silent Installation:Installing software without user interaction, often used for automated deployments.
-
Clean Installation:Installing software on a fresh system, removing any existing conflicting software or settings.
- Improved Efficiency: Streamlined processes and automated tools can save time and resources.
- Enhanced Security: Regular updates and proper configuration help protect against vulnerabilities.
- Better Performance: Properly installed and configured software can run more efficiently.
- Reduced Costs: Automated deployment and maintenance can lower support costs.
-
Package Managers:(e.g., apt, yum, Homebrew) for managing software packages on different operating systems.
-
Deployment Tools:(e.g., SCCM, Ansible, Chef) for automating software deployment across multiple systems.
-
Installation Guides:Documents that provide step-by-step instructions for installing and configuring software.
-
Software Management Systems:Tools that help track and manage software licenses, updates, and compliance.
3.1. Installing and Updating Software Applications
1 Introduction to Software Applications
· Definition: Software applications are programs designed to perform specific tasks, such as word processing, web browsing, and media playback.
· Types of Software:
o Freeware: Free software with no cost.
o Shareware: Software that can be used for a trial period before purchase.
o Open-Source Software: Software with source code available for modification and distribution.
o Commercial Software: Paid software with a license agreement.
2 Installing Software Applications
· Preparation:
o Check System Requirements: Ensure your system meets the minimum requirements for the software.
o Download the Software: Obtain the software from a trusted source.
· Installation Steps:
1. Run the Installer: Double-click the installer file to start the installation process.
2. Follow Prompts: Follow the on-screen instructions to complete the installation.
3. Accept License Agreement: Read and accept the software license agreement.
4. Choose Installation Options: Select installation options such as custom installation paths.
5. Complete Installation: Finish the installation process and restart the computer if prompted.
3 Updating Software Applications
· Automatic Updates:
o Enable Automatic Updates: Configure the software to automatically check for and install updates.
o Check for Updates: Regularly check for updates manually if automatic updates are disabled.
· Manual Updates:
o Download Updates: Visit the software’s official website to download updates.
o Install Updates: Run the update installer and follow the on-screen instructions.
· Best Practices:
o Regular Updates: Keep software up-to-date to ensure security and functionality.
o Backup Data: Backup important data before updating to prevent data loss.
3.2. Operating System Installation and Configuration
1 Introduction to Operating Systems
· Definition: An operating system (OS) is the system software that manages computer hardware, software resources, and provides common services for computer programs.
· Common Operating Systems:
o Microsoft Windows: Widely used in personal computers and enterprise environments.
o macOS: Developed by Apple for Mac computers.
o Linux: An open-source operating system used in servers, desktops, and embedded systems.
2 Installing an Operating System
· Preparation:
o Backup Data: Ensure all important data is backed up.
o Check System Requirements: Verify that your hardware meets the minimum requirements for the OS.
o Create Installation Media: Use a USB drive or DVD to create bootable installation media.
· Installation Steps:
1. Boot from Installation Media: Insert the installation media and restart the computer. Enter the BIOS/UEFI setup to change the boot order.
2. Select Installation Type: Choose between a clean install or an upgrade.
3. Partition the Hard Drive: Create and format partitions as needed.
4. Install the OS: Follow the on-screen prompts to complete the installation.
5. Configure Settings: Set up user accounts, time zone, and other preferences.
6. Install Updates: Connect to the internet and install any available updates.
3 Configuring the Operating System
· User Accounts:
o Create User Accounts: Set up accounts for each user with appropriate permissions.
o Configure Account Settings: Adjust settings such as password policies and user privileges.
· System Settings:
o Display Settings: Adjust screen resolution, brightness, and other display options.
o Network Settings: Configure Wi-Fi and Ethernet connections.
o Sound Settings: Adjust audio output and input settings.
· Security Settings:
o Firewall: Enable and configure the firewall to protect against unauthorized access.
o Antivirus Software: Install and configure antivirus software to protect against malware.
User Account Control (UAC): Adjust UAC settings to control administrative access.